 HOW TO MAKE A UV SKIN
TEXTURE USING PROJECT
PAINT IN BLENDER 2.5 or higher
By Robert Tolman
The object of this tutorial is to create a UV texture for a
mesh model, using Project paint. This technique is
useful for wrapping UV textures on whole human body
models, low poly characters, animal and other shapes.
Now, lets get started...
To Make a UV skin:
1) Start with your mesh in the 3D window, in the Front
view with the front of the mesh facing forward and in the
Edit mode. Also, have a UV/Image editor window open.
2) Unwrap the mesh in the edit mode by pressing the letter
U on your keyboard and selecting Unwrap while the cursor
is in the 3D window. You may adjust the map in the
UV/Image editor grid if desired.
3) Click on Image on the header of the window and select New.
Name it UV Skin and if desired, change the base color.
Make projection views:
4) click on the object data button in the header of the
Properties window. Make a new UV texture by clicking on
the + sign in the UV Texture panel. Name it Front.
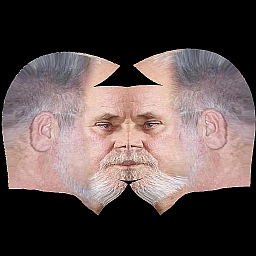
5) Put the cursor in the 3D window and in the front User
Perspecctive view, press the U key and select Project From
View. In the header of the UV/Image editor window, click
on the picture folder icon next to the name. Select the
reference image (Mugshot?.jpg). Adjust the map of
the mesh onto the image the UV/Image editor.
6) Repeat steps 4 & 5 for side view (and any other views
as needed).
After UV maapping is done:
Assign a material to the skin texture UV map:
7) Make the first UV layer active by clicking on the name UV
Skin, in the UV Texture panel. The active layer will be
highlighted blue.
8) Make a texture and material for the skin by clicking on the
texture button on the header of the Properties window, then
click on New and name it Skin.
9) Next, click on the tiny double arrows button in the Type
field then choose Image or Movie as the type.
10) In the Mapping panel,select UV as the Coordinates in the
same manner and a Layer field appears. Leave it blank so
that it will use the default (active) layer.
11) Click the Materials button on the Properties header. In
the Specular panel, set Intensity to "0.000".
12) In the Shading panel, put a checkmark in the Shadeless box.
13) In the Options area put a checkmark in the Face Textures
box.
Get ready to project paint:
Place the cursor in the 3D window and press the letter T
on your keyboard. The Tools panel will appear. Click on
the little double arrows on the Mode field of the 3D
window header. Select Texture Paint mode. A Brush panel
will appear in the Tools.
14) To set the paint to maximum opacity, adjust the Strength
to 1.000.
15) Click on the triangle next to Stroke and put a checkmark
in the box next to Airbrush.
16) Scroll all the way down to the Project Paint Area and
put a checkmark in the box for Stencil and Layer.
17) Click on the triangle next to Tool and click on the little
double arrows in the box. Select Clone from the pop-up list.
18) Click on the name of the first UV layer (UV Skin) that is on
the right of the word "Layer" in the project Paint area.
It doesn't l00k like a button, but it is. Select Front from the
pop-up list.
This sets the UV layer to clone from to the layer named Front.
Later, you may change this to a different layer to clone from.
Paint freely!
And SAVE your work often.
Additional Notes:
UV/Image Editor:
While painting, have the UV Skin in the UV/Image editor
window. You can see it update with each stroke if you click
on View and choose Update Automatically. Also to enable painting
directly on the UV skin, click View and put a checkmark in the
box next to Image painting in the pop-up menu.
To change the layer to clone from just change the selection in
step 18.
To change the opacity of the paint adjust the strength as
in step 14.
To adjust the size of the brush, change the radius.
Tools: The Tool section has 4 tools to choose from.
Clone- copies UV map coordinates from another UV layer
Smear- Smears the color under the brush in the direction
of brush movement.
Soften- Creates a soft blur and blends edges.
Draw- Draws the chosen color.
--- Happy Blending ---
R J Tolman (:^)} January, 2012